First off, I sincerely hope that nobody ever finds this blog post useful. Alas, I’m sure there is some soul out there in a situation similar to my own: hang in there friend.
If you’ve been writing PHP for any length of time, you know how easy it is to write bad PHP: don’t bother with classes, include all your functions in a single 6,000 line file, and certainly don’t set up a folder structure in your git repository.
So, what do you do when you want to start bringing order to the chaos?
I found myself in a situation where I had a few hundred PHP files in the root of a repository; each file defining a class. Unfortunately, none were in a namespace.
Additionally, these were accessible through a manually-defined spl_autoload_register function which was part of a common.php file that got require_once‘d from tons of different places. Some of the places requiring this file were even outside the repository and completely unknown to me.
I wanted to clean things up, but without breaking unknown code.
The first thing I wanted to do was establish a namespace for these classes and to introduce a strategic folder hierarchy. A few google searches quickly proved my suspicion: you can’t present classes belonging to a namespace as if they were available at the root namespace (well, you can with use, but that is scoped only to the current file; I don’t want to change hundreds of files). See here and here
This would be a problem if I want to move in-use classes inside a namespace.
But then I discovered this comment and started musing: “hmmm, I can create a class in the root namespace that extends a class in a child namespace” and “spl_autoload_register lets me try to find a class before PHP gives up” and “what if I could enumerate all classes in a defined namespace and dynamically instantiate a root-namespace proxy?”
And that’s exactly what I did:
// since we tons of legacy files requiring common.php,
// create an autoload proxy for root->ModelV1 until
// we can add "use" statements to all necessary locations
spl_autoload_register(function ($class) {
	if (strpos($class,"\\")!== false) {
		// only attempt to autoload root-namespace'd classes
		return false;
	}
	$namespacesAvailableAtRoot = array("ModelV1");
	foreach ($namespacesAvailableAtRoot as $namespace) {
		if (class_exists(	$namespace."\\" . $class)) {
			$str = sprintf('Class %s extends %s\%s {}', $class, $namespace, $class);
			// this is uugly.  Yes; we're eval-creating new PHP classes at runtime where
			// the new class exists in the root namespace and extends the class implementation from
			// ModelV1.
			// Borrowed from: https://stackoverflow.com/a/13504972
			// and from: https://stackoverflow.com/a/19890311
			eval($str);
			return true;
		}
	}
	return false;
});
Again, I hope absolutely nobody finds this useful. In fact, I hope to thoroughly expunge this code In the Near Future ™ (but we all know how that goes)
If you’re using Ansible to manage configuration files on your servers, you’re probably familiar with the {{ ansible_managed }} tag .
This tag is well behaved from an idempotentcy perspective, but in the nitty-gritty of managing servers where there’s a chance of interaction by humans, this built-in tag leaves a lot to be desired.
This filter plugin will obtain (according to git pretty-formats) the commit hash, author, and date of the last commit to the file provided by the filter plugin structure:
#!/usr/bin/python
# this should be saved to ./filter_plugins/get_last_commit_to_file.py

class FilterModule(object):
  def filters(self):
    return {
      'get_last_commit_to_file': self.get_last_commit_to_file
    }

  def get_last_commit_to_file(self, file_path):
    import os
    try:  # py3
      from shlex import quote
    except ImportError:  # py2
      from pipes import quote
    stream = os.popen('git log -n 1 --pretty=format:\'%h by %an at %aD\' -- ' + quote(file_path))
    output = stream.read()
    return output
So, now we can define two new variables in our group_vars/all.yml file: ansible_workspace_git_url and ansible_managed_custom.
We now have available for use inside any template a nicely formatted (but not necessarily idempotent) header which gives any readers DETAILED information including:
The hostname and BIOS serial number of the host to which this file was rendered
The git repository of the playbook responsible for this template
The filename of the template used to render this file
The hash of the last commit which affected the template used to render this file
The filename of the inventory supplying variables to render this template
The hash of the last commit which affected the inventory supplying variables to render this template
The target path on the target server to where this file was rendered
Now, anytime I’m templating out a file (well, at least any file that supports multiline comments), I can just include our new ansible_managed_custom variable:
<!--
  {{ ansible_managed_custom }}
-->
By switching to this header format, I was able to better assist my teammates with identifying why a template was rendered in a particular fashion, as well as provide them details about how to fix any problems they may find. This template format also helps answer questions about whether the rendered file was _copied_ from one server to another (possibly in a migration) and whether the file is likely to still be under Ansible management.
Telecommuting. Video conferencing. Zoom calls. Some folks shudder at these ideas, while for others these tools are second nature. Now with COVID-19 self-isolation mitigations in effect for nearly two full months, lots of folks without a heavy technical background are beginning to overcome the hurdles to reap the benefits of video conferencing tools.
I’ve been working from home “75%” since March of 2018 and I’ve been contributing to various open-source projects with people around the world since 2015 (not-to-mention that my teenage years were during ‘the rise of social media’), so the concept of online collaboration and communication have become second-nature to me.
Recently, however, I’ve been investing more into my own online-communications toolkit both for live-streaming my software creation process, as well as to enjoy higher-fidelity video conferencing. In this post, I’m going to explain my setup.
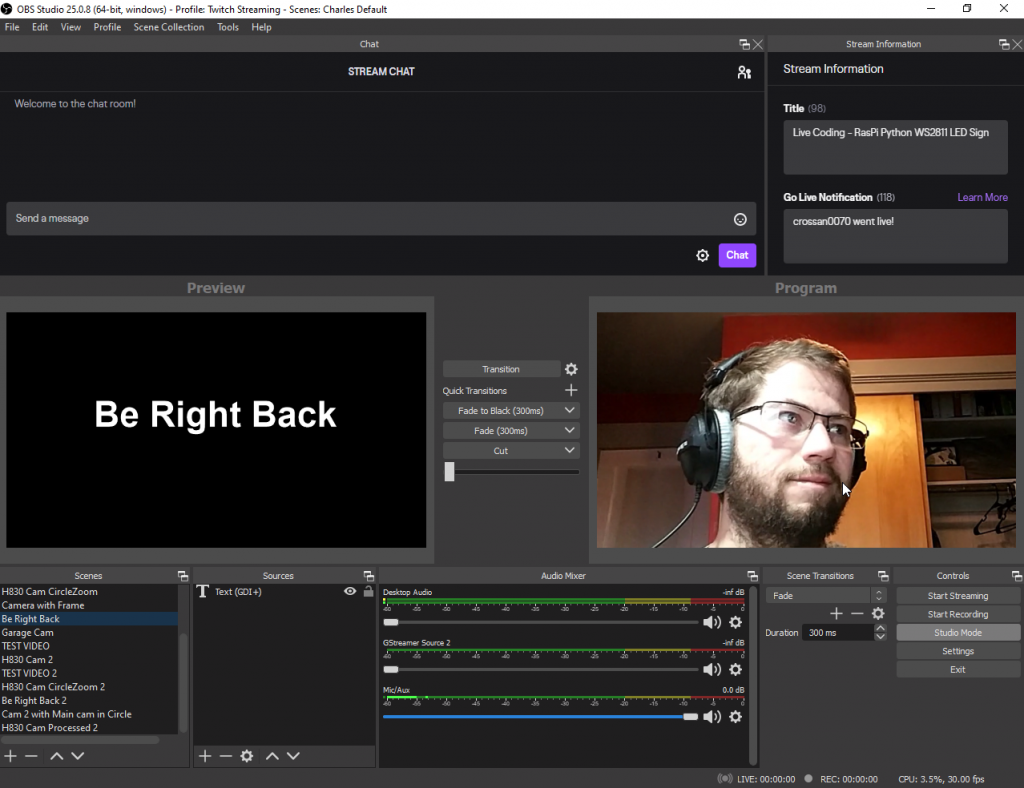
First, let’s start with the cameras. I’m a little on the frugal side, so instead of forking out $90-$120 for a mid-tier Logitech C920 (which are decent entry-level cameras), I took a critical look at one of my spare cell phones. The LG G5 (H830) touts a 5 MP, f/2.2, 18mm 1080p “selfie camera”, which is more than sufficient for calling: with the added benefit that I get an always-on monitor of my “outgoing image!”
To make this cellphone-as-a-webcam scenario work, I use an app called RTSP Camera Server on the phone. This opens any of the H830’s three cameras for access via RTSP. To get this video stream onto my computer, I use Open Broadcaster Software (OBS) with the OBS-Gstreamer plugin to get a malleable real-time stream of the video from my phone’s camera into the OBS workspace.
LG G5 H830 in flexible tripod being photographed by an LG G5 H830 in my hands
Once the stream is in OBS, I’m able to refine the video (crop, adjust colors, filters, etc) and switch between different sources like a screen capture, some “be right back” text, or include video from more than one RTSP camera. I even have two of the exact same phone (the humble H830 is available for $79 on Amazon) so that I can easily demonstrate the focal point of a project or provide a different perspective without causing a “home movie” style camera movement.
OBS Video mixing screen
As you might guess, the super-rich OBS plugin ecosystem has a few options for “consuming” the video from OBS. If I’m joining a video conference call, I use the OBS-VirtualCam plugin to “connect” the output of OBS to the “input” of whatever video conferencing application I may be using (Zoom, Jit.si, Facebook, etc). If I’m live-streaming a project, I use OBS’s built-in streaming functionality.
Overall, this whole video pipeline works pretty well, and gives me a lot of flexibility for both video conferencing as well as for live-streaming to Twitch.tv or YouTube.
Moving on to audio: I use an Audix OM2 microphone which has a hypercardioid pickup pattern that accepts sound aimed directly into the microphone while rejecting noise from the sides or from behind the microphone. This narrow-angle pickup helps a lot with reducing background noise from my computer fans or from other people in the same room.
Audix OM2 Hypercardiod Microphone
Since this microphone connects via XLR, an audio interface is necessary. I use the low-cost, yet perfectly sufficient Behringer UM2 to convert the analog XLR signal into a digital USB signal.
Recently I ran out of space on a 5 node Elasticsearch cluster. Events were not being indexed, and Logstash had amassed a 10GB disk-backed queue. It was not pretty
I discovered that the fifth node was configured incorrectly and was storing the ES data on one of the smaller disk partitions. I stopped the Elasticsearch service on this node while I formulated a plan.
Unfortunately, I didn’t have the time (or confidence) to move the entire /var directory to the large partition (which happened to be serving the /home folder: mounted as /dev/mapper/centos-home), so I instead created a new folder at /home/elasticsearch (so it would be on the large partition), and “symlinked”/var/elasticsearch to the new home folder on the larger partition ln -s /home/elasticsearch/elasticsearch /var/lib/elasticsearch
After creating the Symlink, I started the Elasticsearch service, and watched the logs. After some time, I noticed that there were still no primary shards assigned to this new nodes (despite it being the only node with disk space utilization below the threshold), so I dug in a bit more
Within about 90 seconds, the Elasticsearch cluster began rerouting all of the unassigned shards, and my logstash disk-queue began to shrink as the events poured into the freshly allocated shards on my new node.
Problem solved.
Stay tuned for next week when I pay off the technical debt incurred by placing my Elasticsearch shards on a symlink 😬
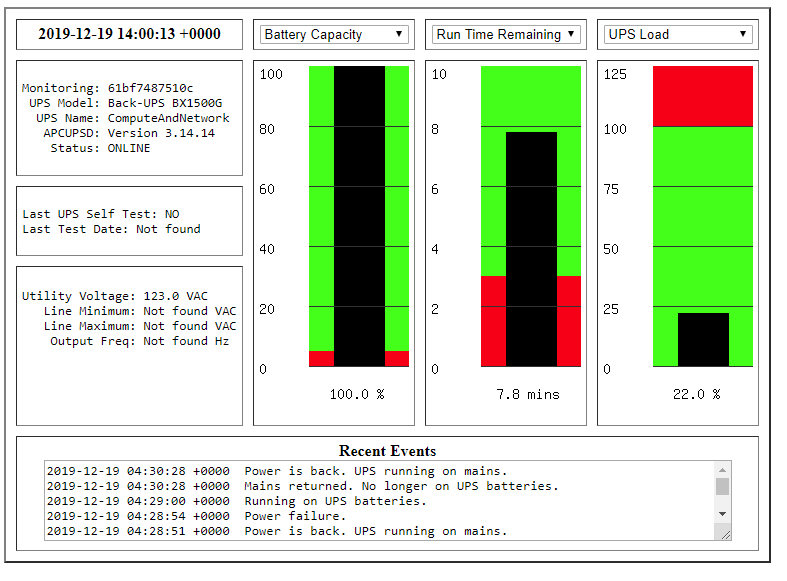
As any proper IT-nerd would agree, UPS devices are critical pieces of equipment not only in the data center, but also at home. However, most home users are not in a position to acquire a massive 10+ kilovolt-amp UPS capable of protecting all circuits by which our various “personal devices” are powered; rather, most home/small office UPS installations are often small desktop units usually under 3kVA. In this scenario, these smaller units are typically allocated to individual devices / ares, and are typically only responsible for signaling the status of the incoming utility power to one device.
What about using multiple UPS devices for different components of the same “workspace”? Or home networks with access points and switches in more than one location (therefore each having its own battery backup)? How would one monitor multiple distributed battery backup units (presuming each UPS unit has only USB connectivity)?
Configure udev rules to ensure a consistent mapping (by UPS serial number) to a named mount point
Create multiple apcupsd configuration files for each connected UPS
Create new “action” and “control” scripts for each UPS
Re-configure the apcupsd init.d/systemd scripts to launch multiple instances of the daemon (one for each UPS)
I’m generally not a fan of creating large “custom” configuration files in obscure locations with great variance from the distributed package, so this process seemed a little “hackey” to me; especially since the end result of all of these configuration files was to have “isolated processes” for each UPS to monitor.
Dockerizing APCUPSD
At this point, I decided to take a different approach to isolating each apcupsd process: an approach with far greater discoverability, version-control potential, and scalability. Docker.
I decided to use the first step outlined in the apcupsd guide on the Debian Wiki (creating udev rules to ensure physical devices are given a persistent path on boot/attach). UPS devices are generally mounted at /dev/usb/hiddev*, so we should confirm that we have a few present:
# ls /dev/usb
hiddev0  hiddev1

# lsusb
Bus 002 Device 001: ID 1d6b:0002 Linux Foundation 2.0 root hub
Bus 004 Device 002: ID 051d:0002 American Power Conversion Uninterruptible Power Supply
Bus 004 Device 001: ID 1d6b:0001 Linux Foundation 1.1 root hub
Bus 001 Device 001: ID 1d6b:0002 Linux Foundation 2.0 root hub
Bus 003 Device 002: ID 051d:0002 American Power Conversion Uninterruptible Power Supply
Bus 003 Device 001: ID 1d6b:0001 Linux Foundation 1.1 root hub
Great! we’ve got things that look like UPS devices on /dev/usb/hiddev0 and /dev/usb/hiddev1. Now to get the serialnumbers:
# udevadm info --attribute-walk --name=/dev/usb/hiddev0 | egrep 'manufacturer|product|serial'
    ATTRS{manufacturer}=="American Power Conversion"
    ATTRS{product}=="Back-UPS BX1500G FW:866.L5 .D USB FW:L5 "
    ATTRS{serial}=="8975309"
    ATTRS{manufacturer}=="Linux 4.4.0-170-generic ohci_hcd"
    ATTRS{product}=="OHCI PCI host controller"
    ATTRS{serial}=="0000:00:02.0"
# udevadm info --attribute-walk --name=/dev/usb/hiddev1 | egrep 'manufacturer|product|serial'
    ATTRS{manufacturer}=="American Power Conversion"
    ATTRS{product}=="Back-UPS NS 1100M2 FW:953.e3 .D USB FW:e3     "
    ATTRS{serial}=="8675310"
    ATTRS{manufacturer}=="Linux 4.4.0-170-generic ohci_hcd"
    ATTRS{product}=="OHCI PCI host controller"
    ATTRS{serial}=="0000:00:04.0"
With the now known serial numbers, we create udev rules to persist these devices to known map points:
## FILE AT /lib/udev/rules.d/ups.rules

# SCREEN UPS
KERNEL=="hiddev*", ATTRS{manufacturer}=="American Power Conversion", ATTRS{serial}=="8975309", OWNER="root", SYMLINK+="usb/ups-screen"

# ComputeAndNetwork UPS
KERNEL=="hiddev*", ATTRS{manufacturer}=="American Power Conversion", ATTRS{serial}=="8675310", OWNER="root", SYMLINK+="usb/ups-compute-and-network"
And now to re-run the udev rules:
udevadm trigger --verbose --sysname-match=hiddev*
Now, we should have some “nicely named” UPS USB devices:
# ls -la /dev/usb
total 0
drwxr-xr-x  2 root root    120 Dec 18 19:55 .
drwxr-xr-x 22 root root   4280 Dec 18 19:55 ..
crwxrwxrwx  1 root root 180, 0 Dec 18 19:55 hiddev0
crwxrwxrwx  1 root root 180, 1 Dec 18 19:55 hiddev1
lrwxrwxrwx  1 root root      7 Dec 18 19:55 ups-compute-and-network -> hiddev1
lrwxrwxrwx  1 root root      7 Dec 18 19:55 ups-screen -> hiddev0
Excellent! Now, anytime these devices are plugged/unplugged, we shouldn’t have to guess which is hiddev0 and which is hiddev1, since udev will automagically provide us named mount points for these USB devices, which will be critical to the next steps
Next, I created a docker-compose file with the three “services” I decided I’d like for this setup:
APCUPSD for the “screens” UPS
APCUPSD for the “Compute and Network” UPS
Apache/Multimon to provide an HTTP based interface
This docker-compose file also contained pointers to specific Dockerfiles to actually build an image for each service (hint: the two apcupsd services use the same container with different configurations).
The apcupsd container is nothing more than the latest Alpine linux image; apcupsd from the apk repository and a very lightweightapcupsd configuration files (configured to watch onlythe UPS at /dev/ups – more on this later)
The multimon container uses the latest Apache/alpine image, and adds apcupsd-webif from the apk repository along with a few configuration files for multimon. Additionally, I wrote an entrypoint.sh script to parse environment variables and generate a configuration file for multimon so that the UPS(s) displayed on the web interface can be set from the docker-compose file.
Having now covered the build process, let’s put together the docker-compose services:
APCUPSD image as a container with a device mapping for ups-compute-and-network on the host to /dev/ups in the container
APCUPSD image as a container with a device mapping for ups-screen on the host to /dev/ups in the container
Now, instead of attempting to create custom init scripts, multiplex processes within systemd, and override the packaged mechanisms for apcupsd‘s configuration discovery, I instead have a cleanly defined interface for isolating instances of apcupsd to provide a status page for my two APC UPS devices.
Thanks for reading, and hopefully this helps you in some way!
This is my first official “metal casting blog post.” It’s been a small hobby of mine since February of 2019, and I’ve only shared some pictures on Facebook/Twitter, but I’ve decided I’m going to be more intentional about chronicling my projects on my personal blog.
A while back, I saw a really neat video on YouTube where the author created a look of embossed metal letters against a mahogany wood block: https://youtu.be/15cE1SfwlQo?t=1019
After some time, I realized this would be a really neat technique to use for hand-crafted gifts. My dad loves “all things constitution,” so the idea began to create a plaque proclaiming “We The People” in this charred-wood-embossed-metal-style.
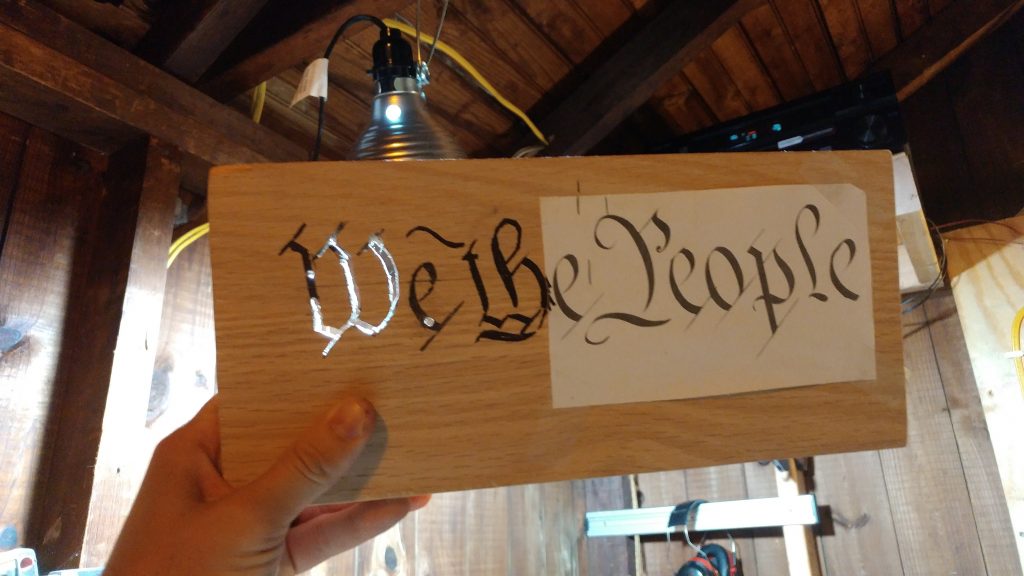
I went to the nearby hardware store to pick up a nice piece of oak; I printed out an authentic-looking rendition of the words, and got to work.
My first challenge was transposing the printed text onto the oak board. I first tried using a Sharpie marker to “trace” the text, and follow it with a hacksaw:
This process was really really slow and laborious, so brainstormed a bit to figure out how to make this go quicker. I ended up using my table saw to “thin-out” the sections of the (originally 3/4″ thick) board down to about 1/4″:
I also picked up some new wood-cutting bits for my Dremel and was able to make quick work of the remainder of the text (also without needing to first “transpose” the printout via Sharpie to the face of the wood).
I did make a small mistake here – I didn’t consider the need for “inner-letter support” (take a look at the inner section of the “W”); I’m chalking that up to “lessons learned.” I wasn’t too concerned with this at first, since the next phase of the project should have provided a degree of “masking” over this mistake.
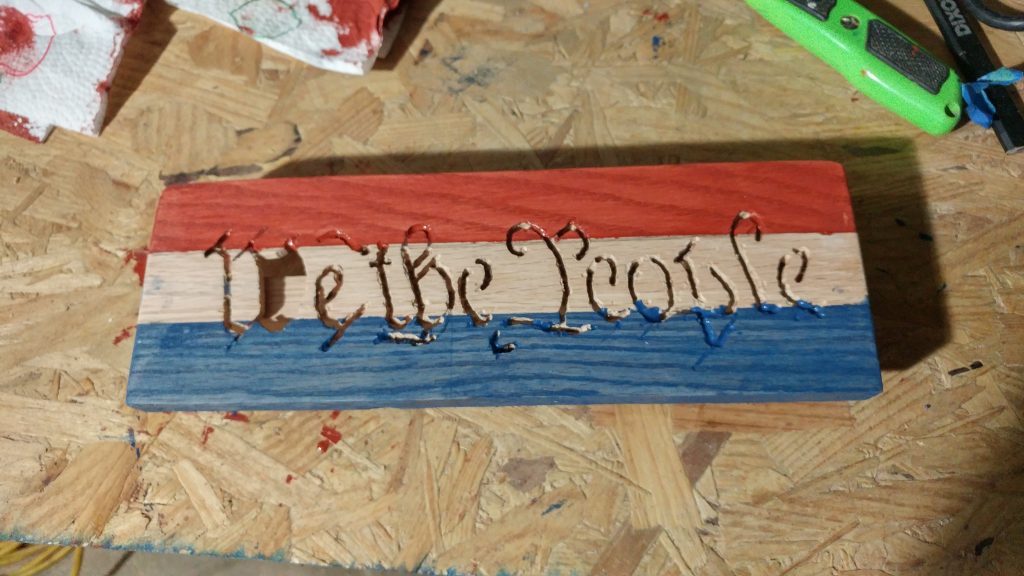
After completing the cutouts (and proving to myself that I was capable of actually representing the text fairly accurately), I wanted to add some color: Red and Blue (thinking that the light colored wood would infer a “white” stripe. I found some water-based stain on Amazon (Minwax Red and Blue) that provided the colors I was looking for:
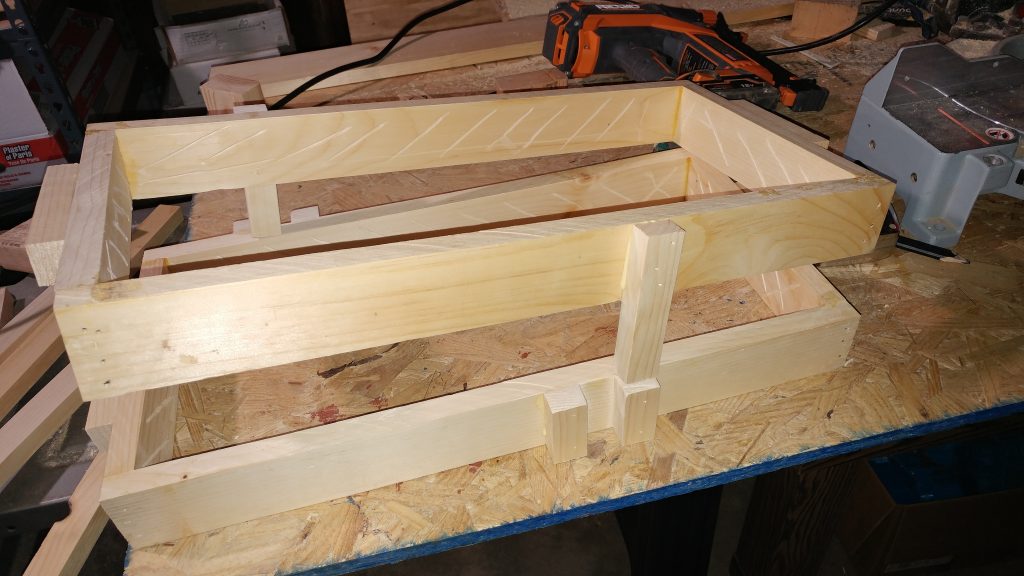
Next, I had to create a new “flask” to facilitate a sand-mold of this size (all my previous sand casting have been much smaller). So I constructed a new cope (top) and drag (bottom) with keyed alignment posts to ensure both sides would align after being separated and joined. I also added grooves to the inner faces of the flask so that the ptreobond sand would have some surfaces to grab onto.
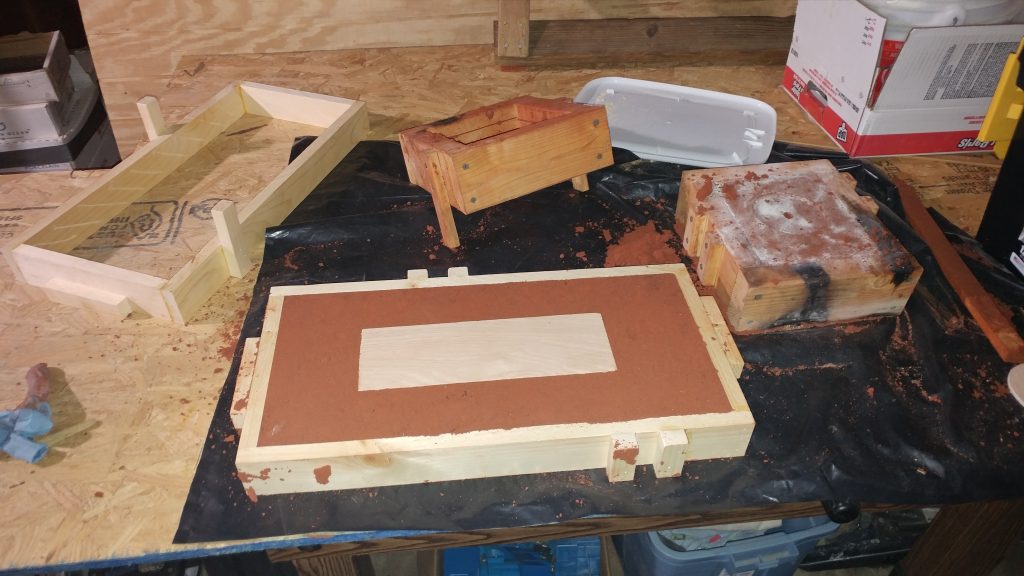
After building the flask (and ordering more petrobond to account for my newly expanded flask), I packed the sand around a non-cutout replica of the plaque (since I wanted the metal to “fill in” the back section of the plaque, I couldn’t have the sand create a negative of that void)
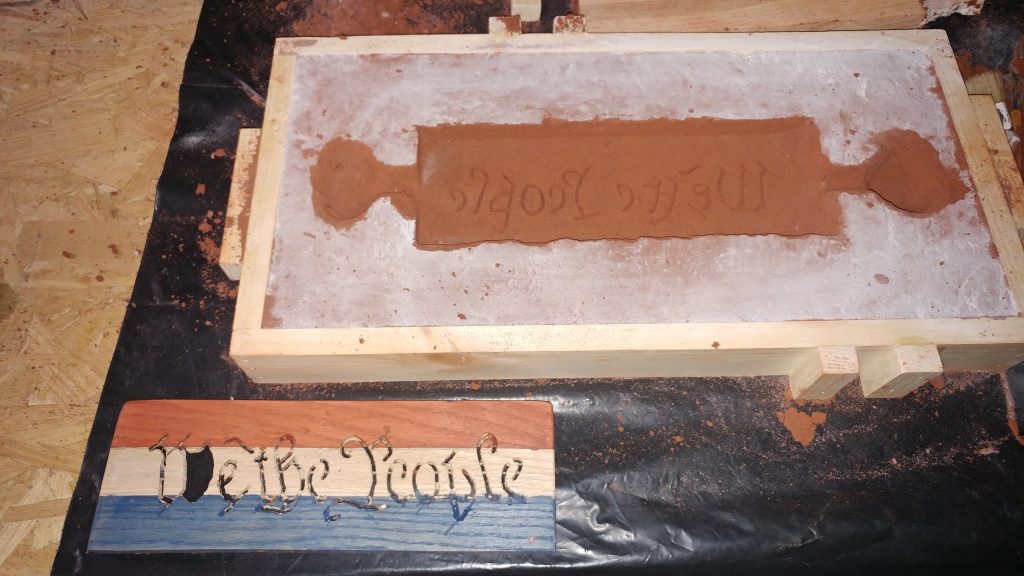
Next, I swapped out the “blank” piece of wood for the text-engraved piece, and impressed the lettering from the wood cutout into the petrobond. I also carved a riser and a very simple gate system for the molten metal to flow.
Since molten metal will shrink 6-12% while cooling, it is important to have a “reservoir” of still-hot molten metal to back-flow into the important pieces of your casting: this allows you to control where the shrinkage will occur: in the riser and sprue, instead of in your part.
After getting the flask all-set, I heated my plaque up on top of my kerosene heater for a few hours to dry-out any trapped moisture. Trapped moisture is very dangerous in a molten-metal scenario, as it vaporizes instantly into steam and expands rapidly in volume and can cause explosions, so I was cautious to avoid this scenario.
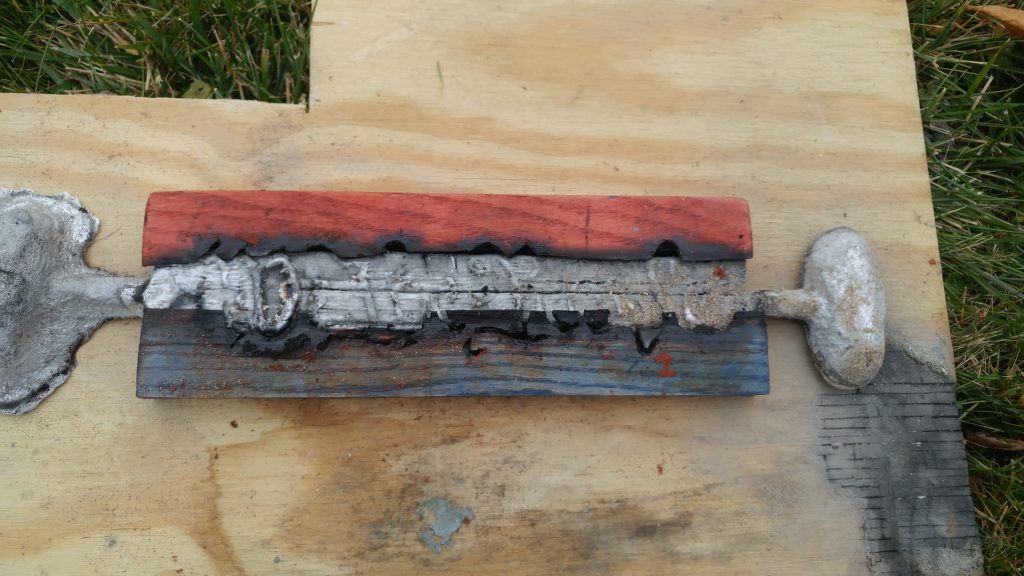
Finally, I put the top back on the flask, and pored the metal. Unfortunately, I didn’t capture any photographs of the closed-and-finished flask, nor of the actual pour. Almost immediately as I was pouring the metal, smoke began flowing from the vent holes and from the riser hole.
After pouring, I let the metal cool covered in the flask for a few minutes. This elapsed “cooling time” may have been my project-ending mistake. When I finally removed the cope from my flask, I was dismayed at the havoc the molten metal wreaked on the oak plank
The metal stuck together nicely, and carried a faint image of the previously well-defined text; however, the thin section of wood was completely burnt beyond salvage.
I could kind of tell where the original text was lined up with the remaining slim sections of red and blue wood
Unfortunately, there’s no saving this project.
If I ever decide to mix metal and wood again, I’ll be sure to take away a few lessons/thoughts from this project:
Thinner wood sections burn faster
Oak isn’t the most flame-resistant wood available (check out cedar or epe, or manufactured materials)
Limit exposure time of metal to wood; maybe pour into an open-topped drag and dunk the compound piece into cooling water as soon as the metal solidifies
The charred color against the stain sections actually looks decent
Use the right tools from the beginning (Dremel, not coping saw)
Try “riskier” actions on a small-sample before investing a lot of time in the final piece
Recently, I needed a mechanism to identify, as part of a try/catch block, which stage in a Jenkins Groovy Scripted Pipeline was the last to execute before the catch block was called.
Jenkins does not currently store details about the last stage to run outside of the context of that specific stage. So, in other words env.STAGE_NAME is valid with a particular stage("I'm a stage"){ //valid here} block, but not in, say, a catch(Exception e) { // where was I called from? } block.
To get around this, I found a few examples, and cobbled together something that I believe will provide future functionality. I present to you the extensibleContextStage:
// Jenkins groovy stages are somewhat lacking in their ability to persist
// context state beyond the lifespan of the stage
// For example, to obtain the name of the last stage to run,
// one needs to store the name in an ENV varialble (JENKINS 48315)
// https://issues.jenkins-ci.org/browse/JENKINS-48315

// We can create an extensible stage to provide attitional context to the pipeline
// about the state of the currently running stage.

// This also provides a capability to extend pre- and post- stage operations

// Idea / base code borrowed from https://stackoverflow.com/a/51081177/11125318
// and from https://issues.jenkins-ci.org/browse/JENKINS-48315?focusedCommentId=321366&page=com.atlassian.jira.plugin.system.issuetabpanels%3Acomment-tabpanel#comment-321366

def call(name, Closure closure) {
    env.BUILD_LAST_STAGE_STARTED = name
    try {
        stage(name) {
            def result = closure.call()
            return result
        }
        env.BUILD_LAST_STAGE_SUCCEEDED = name
    }
    catch(Exception ex) {
        env.BUILD_LAST_STAGE_FAILED = name
        throw ex;
    }
}
This is a drop-in replacement for stage(string name){ closure} blocks in a Jenkins Groovy Scripted Pipeline, but with the added benefit of additional environment variables:
env.BUILD_LAST_STAGE_STARTED
env.BUILD_LAST_STAGE_SUCCEEDED
env.BUILD_LAST_STAGE_FAILED
So, as a full example, one can now do this (which was previously awkward):
try {
    extensibleContextStage("Do some things")
    {
        //whatever
    }
    extensibleContextStage("Do some More things")
    {
       throw new Exception("MAYHEM!")
    }
    extensibleContextStage("Do some final things")
    {
        //whatever
    }
}
catch(Exception e){
    // at this point, with normal stage, we wouldn't know where MAYHEM came from,
    // but with extensibleContextStage, we can look at either
    // env.BUILD_LAST_STAGE_FAILED or  env.BUILD_LAST_STAGE_STARTED
    // to know that "Do some More things" was the offendign stage.
    // this is super handy to send "helpful" notifications to slack/email
}
I hope this helps someone (if even my future self)
Sometimes (especially after an un-graceful process restart), Jenkins jobs will be stuck in a running state, and cancelling through the UI just doesn’t work.
Fortunately, jobs can be stopped via the Jenkins script console with this command (courtesy of https://stackoverflow.com/a/26306081/11125318):
Jenkins.instance.getItemByFullName("JobName")
                .getBuildByNumber(JobNumber)
                .finish(
                        hudson.model.Result.ABORTED,
                        new java.io.IOException("Aborting build")
                );
I’m attempting to obtain a Git Repo URL from a Jenkins Change set in a Groovy Scripted Pipeline, but I keep running into the same issue: the browser property (obtained via .getBrowser()) on my hudson.plugins.git.GitChangeSetList object is undefined.
I’m running the below code (with inline “status comments”) from the Jenkins groovy script console in an attempt to extract the RepoUrl from Chagesets in a Jenkins Multi branch groovy scripted pipeline:
def job = Jenkins.instance.getItem("MyJenkinsJob")
def branch = job.getItems().findAll({
            item -> item.getDisplayName().contains("Project/CreateChangeLogs")
        })

printAllMethods(branch[0].getFirstBuild()) //this works, and is a org.jenkinsci.plugins.workflow.job.WorkflowRun

def builds = branch[0].getBuilds()
def currentBuild = builds[0]

currentBuild.changeSets.collect {
  printAllMethods(it) // this works too, and is a hudson.plugins.git.GitChangeSetList.
  // enumerated methods are equals(); getClass(); hashCode(); notify(); notifyAll(); toString(); wait(); createEmpty(); getBrowser(); getItems(); getKind(); getRun(); isEmptySet(); getLogs(); iterator();

  it.getBrowser().repoUrl // this fails
  // the error is java.lang.NullPointerException: Cannot get property 'repoUrl' on null object
}
I found the utility class for PrintAllMethods here (https://bateru.com/news/2011/11/code-of-the-day-groovy-print-all-methods-of-an-object/):