As any proper IT-nerd would agree, UPS devices are critical pieces of equipment not only in the data center, but also at home. However, most home users are not in a position to acquire a massive 10+ kilovolt-amp UPS capable of protecting all circuits by which our various “personal devices” are powered; rather, most home/small office UPS installations are often small desktop units usually under 3kVA. In this scenario, these smaller units are typically allocated to individual devices / ares, and are typically only responsible for signaling the status of the incoming utility power to one device.
What about using multiple UPS devices for different components of the same “workspace”? Or home networks with access points and switches in more than one location (therefore each having its own battery backup)? How would one monitor multiple distributed battery backup units (presuming each UPS unit has only USB connectivity)?
APCUPSD
Enter apcupsd: “A daemon for controlling APC UPSes.” Unfortunately, the plurality of this utility’s tagline indicates a wide range of supported devices rather than multiple concurrently connected devices. To date, I’ve found one article describing how to configure apcupsd to support multiple USB-attached UPS devices, and it’s not really pretty. The gist of the process is as follows:
- Configure udev rules to ensure a consistent mapping (by UPS serial number) to a named mount point
- Create multiple apcupsd configuration files for each connected UPS
- Create new “action” and “control” scripts for each UPS
- Re-configure the apcupsd init.d/systemd scripts to launch multiple instances of the daemon (one for each UPS)
I’m generally not a fan of creating large “custom” configuration files in obscure locations with great variance from the distributed package, so this process seemed a little “hackey” to me; especially since the end result of all of these configuration files was to have “isolated processes” for each UPS to monitor.
Dockerizing APCUPSD
At this point, I decided to take a different approach to isolating each apcupsd process: an approach with far greater discoverability, version-control potential, and scalability. Docker.
I decided to use the first step outlined in the apcupsd guide on the Debian Wiki (creating udev rules to ensure physical devices are given a persistent path on boot/attach). UPS devices are generally mounted at /dev/usb/hiddev*, so we should confirm that we have a few present:
# ls /dev/usb
hiddev0  hiddev1

# lsusb
Bus 002 Device 001: ID 1d6b:0002 Linux Foundation 2.0 root hub
Bus 004 Device 002: ID 051d:0002 American Power Conversion Uninterruptible Power Supply
Bus 004 Device 001: ID 1d6b:0001 Linux Foundation 1.1 root hub
Bus 001 Device 001: ID 1d6b:0002 Linux Foundation 2.0 root hub
Bus 003 Device 002: ID 051d:0002 American Power Conversion Uninterruptible Power Supply
Bus 003 Device 001: ID 1d6b:0001 Linux Foundation 1.1 root hub
Great! we’ve got things that look like UPS devices on /dev/usb/hiddev0 and /dev/usb/hiddev1. Now to get the serialnumbers:
# udevadm info --attribute-walk --name=/dev/usb/hiddev0 | egrep 'manufacturer|product|serial'
    ATTRS{manufacturer}=="American Power Conversion"
    ATTRS{product}=="Back-UPS BX1500G FW:866.L5 .D USB FW:L5 "
    ATTRS{serial}=="8975309"
    ATTRS{manufacturer}=="Linux 4.4.0-170-generic ohci_hcd"
    ATTRS{product}=="OHCI PCI host controller"
    ATTRS{serial}=="0000:00:02.0"
# udevadm info --attribute-walk --name=/dev/usb/hiddev1 | egrep 'manufacturer|product|serial'
    ATTRS{manufacturer}=="American Power Conversion"
    ATTRS{product}=="Back-UPS NS 1100M2 FW:953.e3 .D USB FW:e3     "
    ATTRS{serial}=="8675310"
    ATTRS{manufacturer}=="Linux 4.4.0-170-generic ohci_hcd"
    ATTRS{product}=="OHCI PCI host controller"
    ATTRS{serial}=="0000:00:04.0"
With the now known serial numbers, we create udev rules to persist these devices to known map points:
## FILE AT /lib/udev/rules.d/ups.rules

# SCREEN UPS
KERNEL=="hiddev*", ATTRS{manufacturer}=="American Power Conversion", ATTRS{serial}=="8975309", OWNER="root", SYMLINK+="usb/ups-screen"

# ComputeAndNetwork UPS
KERNEL=="hiddev*", ATTRS{manufacturer}=="American Power Conversion", ATTRS{serial}=="8675310", OWNER="root", SYMLINK+="usb/ups-compute-and-network"
And now to re-run the udev rules:
udevadm trigger --verbose --sysname-match=hiddev*Now, we should have some “nicely named” UPS USB devices:
# ls -la /dev/usb
total 0
drwxr-xr-x  2 root root    120 Dec 18 19:55 .
drwxr-xr-x 22 root root   4280 Dec 18 19:55 ..
crwxrwxrwx  1 root root 180, 0 Dec 18 19:55 hiddev0
crwxrwxrwx  1 root root 180, 1 Dec 18 19:55 hiddev1
lrwxrwxrwx  1 root root      7 Dec 18 19:55 ups-compute-and-network -> hiddev1
lrwxrwxrwx  1 root root      7 Dec 18 19:55 ups-screen -> hiddev0
Excellent! Now, anytime these devices are plugged/unplugged, we shouldn’t have to guess which is hiddev0 and which is hiddev1, since udev will automagically provide us named mount points for these USB devices, which will be critical to the next steps
Next, I created a docker-compose file with the three “services” I decided I’d like for this setup:
- APCUPSD for the “screens” UPS
- APCUPSD for the “Compute and Network” UPS
- Apache/Multimon to provide an HTTP based interface
This docker-compose file also contained pointers to specific Dockerfiles to actually build an image for each service (hint: the two apcupsd services use the same container with different configurations).
The apcupsd container is nothing more than the latest Alpine linux image; apcupsd from the apk repository and a very lightweight apcupsd configuration files (configured to watch onlythe UPS at /dev/ups – more on this later)
The multimon container uses the latest Apache/alpine image, and adds apcupsd-webif from the apk repository along with a few configuration files for multimon. Additionally, I wrote an entrypoint.sh script to parse environment variables and generate a configuration file for multimon so that the UPS(s) displayed on the web interface can be set from the docker-compose file.
Having now covered the build process, let’s put together the docker-compose services:
- APCUPSD image as a container with a device mapping for
ups-compute-and-networkon the host to/dev/upsin the container - APCUPSD image as a container with a device mapping for
ups-screenon the host to/dev/upsin the container - Multimon with an environment variable containing the
docker-composeservice names of the two APCUPSD instances (docker-composeservices are discoverable by DNS name within a composed network)
Full Docker setup here: https://github.com/crossan007/APCUPSD-Multimon-Docker
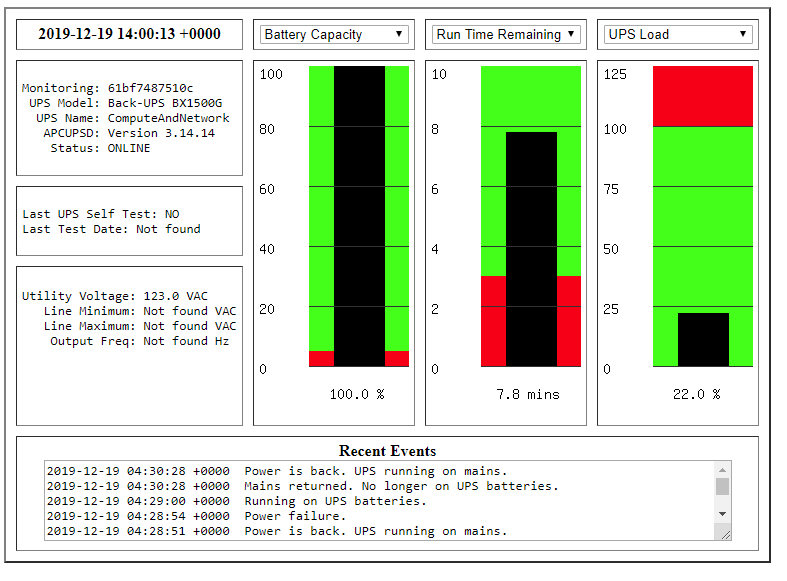
Now, instead of attempting to create custom init scripts, multiplex processes within systemd, and override the packaged mechanisms for apcupsd‘s configuration discovery, I instead have a cleanly defined interface for isolating instances of apcupsd to provide a status page for my two APC UPS devices.

Thanks for reading, and hopefully this helps you in some way!